[Behind The Scenes]
Phase II: The Production
[Tools that I used:]

Procreate
(hand-drawn animation & BG)

Procreate Dreams
(computer animation)
Adobe Premiere Pro
(sound editing & final editing)
[Step 1: Sound Editing]
First, I cropped the soundtrack into shorter clips so that it would be easier for me to animate each shot and made a record of the shot details.

Screenshot of sound editing
[Step 2: The Animation]
Each shot was animated with the following steps:
*Keyframing
*Inbetweening
*Colouring
Background & Computer Animation
Final Editing
* = Character Animation
[I. Keyframing]

After carefully designing the composition of the shots,
I started with the keyframing. I sketched out the frames roughly
so I wouldn't waste too much time, even if I made a mistake.
*
Also, since I want the animation to be music-synced, the keyframes often match the beat. Therefore, the soundtrack helped a lot with the timing of the animation.
Example of Keyframing
[II. Inbetweening]
Next, with the keyframes ready, I drew the in-between frames. Whenever I'm uncertain about the timing of the actions, I try to imagine the movement or even record myself acting it out.
*
Since there were not many online references for what I had in mind, most of them were self-recorded.

Example of Inbetweening & Self-recorded reference
[III. Colouring]

Exported CMYK Image (less saturated)

Exported RGB Image (more saturated)
Then, as the timing felt nice and the animation looked smooth, I added outlines and coloured the characters based on the colour palette I designed during the pre-production stage.
*
During this stage, I encountered a technical issue related to the colour profile. Initially, I wanted to create a hand-drawn impression for the animation, so I used the CMYK colour profile (which the colours of the exported images will look less saturated).
*
But then, when I imported the video references to Procreate, the software automatically created a new RGB file for them. Without noticing the issue, I drew directly onto the RGB files. I didn't notice the mistake until I imported them to Procreate Dreams for further editing (as the colours seemed off)...
*
Unfortunately, the software doesn't allow me to change the colour profiles of existing works directly. Hence, I had to copy and paste every frame from the RGB files to the new CMYK files, applied alpha lock and re-coloured every single frame :'(
*
I was so depressed when I realised my mistake, but glad that everything got sorted out at the end and I've learned my lesson.
[IV. Background & Computer Animation]
Moving onto the backgrounds and camera movements...thanks to the new Procreate Dreams software, I can easily combine my illustrations and character animation by dragging the files from Procreate to Dreams.
(*THIS IS NOT A BUSINESS COLLABORATION LOL*)
*
I drew the background/foreground and character animation separately in Procreate, then I imported them to Dreams to combine them.
In some shots, I applied camera movements by adding keyframes to the layers. After that, I adjusted the easings to make the animation look nicer. For the foreground, I animated the waves frame by frame to make them more natural, then layered them on top of the background and character animation.
*
In one of the shots (passing ball), I just couldn't get the motion of the water polo right by hand drawing. Therefore, I made use of this 'keyframe' function and solved the problem.
*
In the final game scene, I wanted to animate the background to match the soundtrack’s energetic vibes. Initially, I would like to visualise the sound vibes with line/pattern movements, but it will cause a heavy workload. Therefore, I came up with a few alternatives.
*
I tried to use textured brushes to create a flickering effect, yet they didn’t work well. Also, the disorderliness of the flickering may carry a meaning of confusion and illogical. There is indeed a lot of uncertainty in the game field; still, we players keep calm and play smart to score.
*
In the end, I spent some time filling a 3000*3000 pixel canvas with irregular patterns that matched the current art style. Next, I imported it as the background of the scene and used the ‘Performing’ function in Procreate Dreams to animate its casual movement. The result looks satisfying, and the audience wouldn’t notice the patterns being repeated as their focus will be on the character animation.
Example of Camera Movement

Screenshot of Procreate Dreams (Keyframe)

Background Pattern 1

Final Pattern
[V. Final Editing]
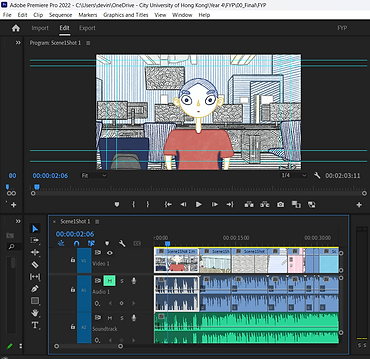
As I finished each shot in Procreate Dreams (1920*1080, 12 fps),
I exported them as .mp4 files. Next, I combined all of the animated clips into a single track and adjusted their lengths to match the soundtrack more perfectly in Adobe Premiere Pro. Lastly, I exported the final animation (.mov file, 24 fps).
Screenshot of Final Editing

Keyframes

Coloured

In-betweens added

Finished